Been a while since I last made a tutorial, noticed that the links to the past tutorials are a bit messy (oops!)

This pattern is made to fit Dollfie Dream, feel free to adapt it for other dolls!
IMPORTANT!:
You will need to use light colour fabric or a fabric which you know will not stain your Dollfie Dream.  If you want to use a colour fabric, especially dark color fabric, please test it on a part of your doll which is not normally exposed to check if it stains.

In this tutorial, I used a dark grey cotton knit fabric which I have tested on a spare bust piece I have –  I know for sure the fabric I use will not stain my dollfie dream’s vinyl body. I have bad experience with dark sewing thread (black sewing thread especially), so I am using white thread — also, it is easier to see on photos.
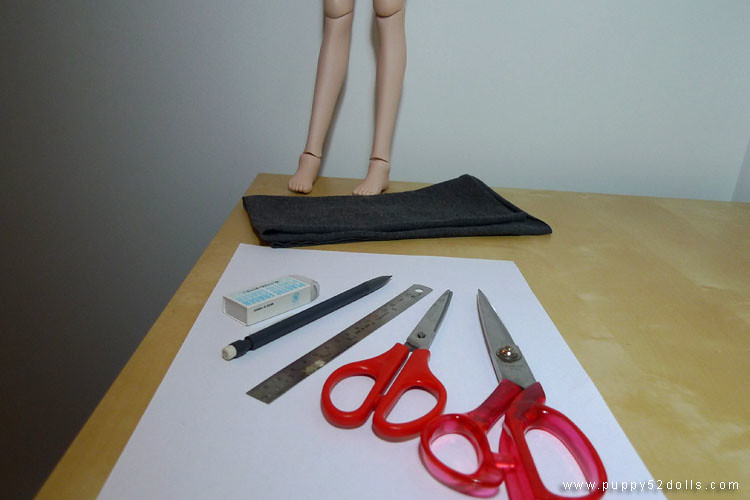
http://farm5.static.flickr.com/4141/4887045505_30c1b0fb19.jpg

You will need:

  • A Dollfie Dream to lend you her leg (or a different doll if you prefer)
  • Light colour knit fabric (example thin tee-shirt material)
  • Paper
  • Eraser (in case of mistakes, or if you are going to trace with a pen after)
  • Pencil (Optional, a pen)
  • Ruler — if you prefer to make a shorter pair of socks
  • Scissors for cutting out the pattern
  • Scissors for the fabric
  • Sewing machine with light thread (not pictured above) Please use ball-point needle for knit fabric!

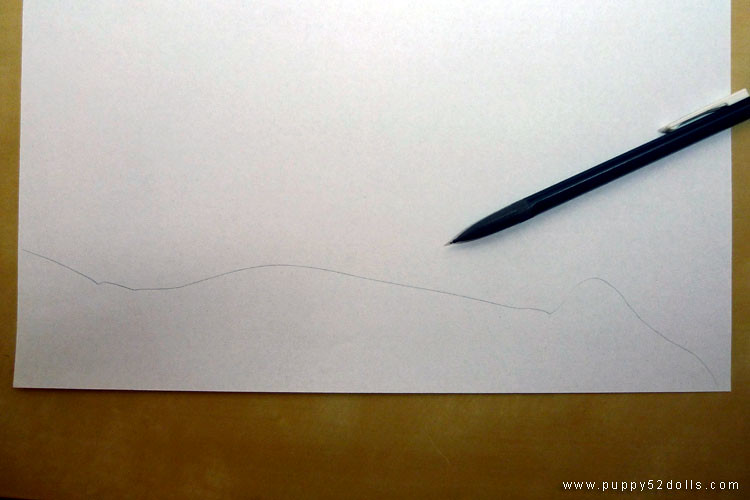
1) Position your dollfie’s leg on the edge of the paper as shown below
http://farm5.static.flickr.com/4093/4887648512_6f084b8d30.jpg

2) Use the pencil to trace the shape of the leg onto the paper, when done move your dollfie to a safe place :)
http://farm5.static.flickr.com/4136/4887648540_52caac588c.jpg

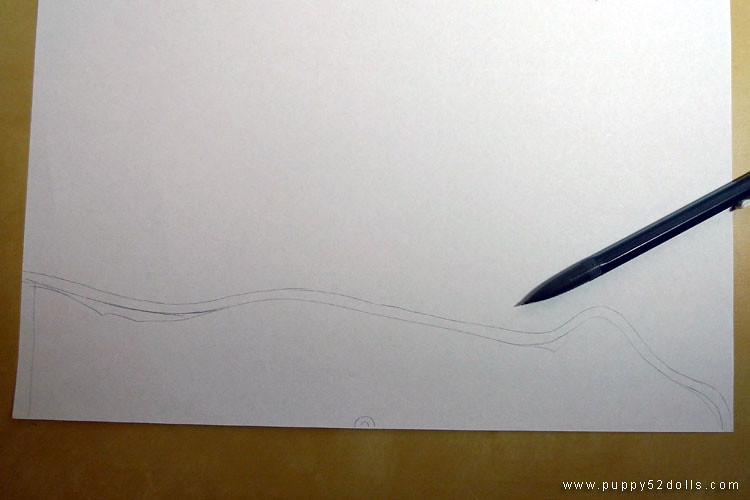
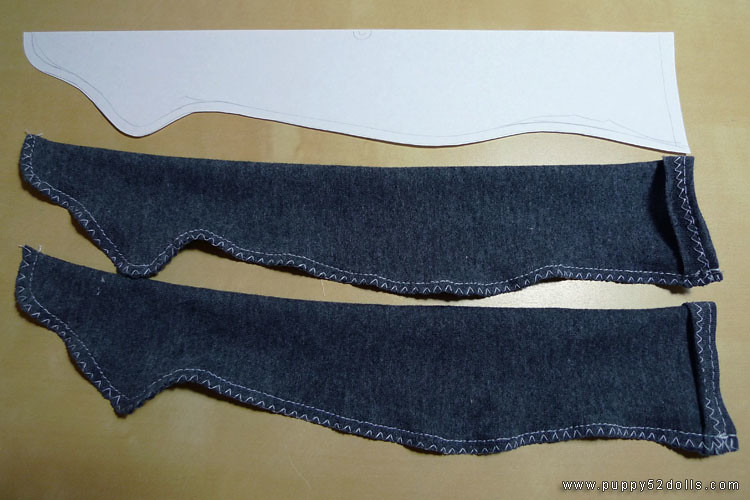
3) Smooth out some of the lines with the pencil, mainly behind where the knee is, and behind the heel. Add a 0.5cm seam allowance line overall, at this stage it is optional that you trace the final outlines with a pen, and erase the pencil lines. I skipped that ^^; If you do that make sure the ink is completely dry before the next step.
http://farm5.static.flickr.com/4134/4887045605_fd7f013b63.jpg

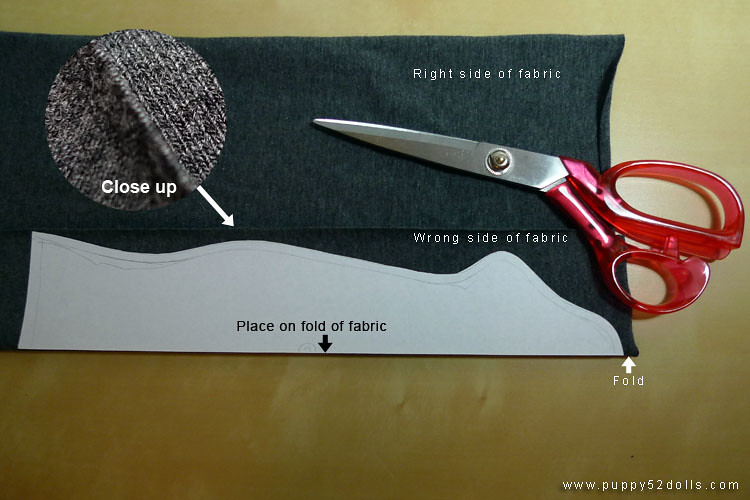
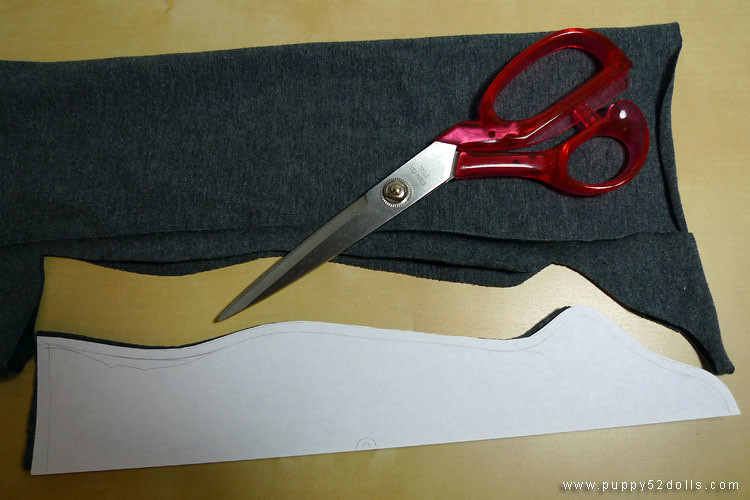
4) Cut out the paper pattern and place the longer straight part on the fold of the fabric, the “wrong” side of the fabric should be facing outside.
http://farm5.static.flickr.com/4142/4887648600_1ccb77c1d1.jpg

5) Carefully cut around the pattern with the scissors for cutting fabric.
http://farm5.static.flickr.com/4102/4887648636_3a4594bae5.jpg

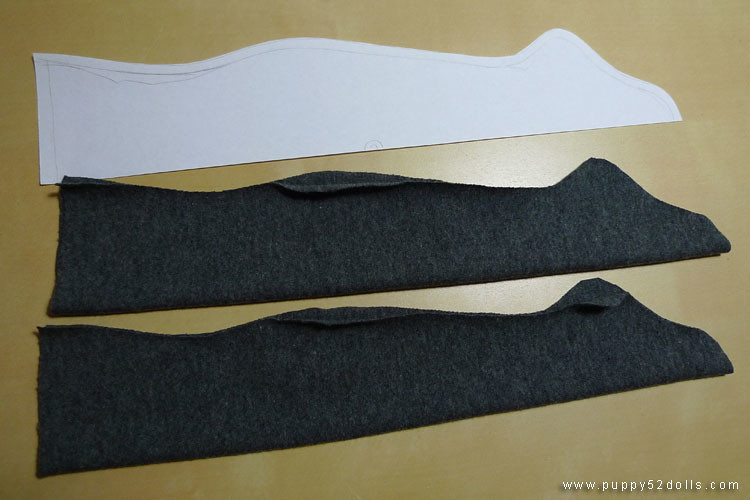
6) Fold the rest of the fabric again the same way (wrong side facing outwards) and cut another piece for the 2nd sock.
http://farm5.static.flickr.com/4080/4887648662_3b502b8f93.jpg

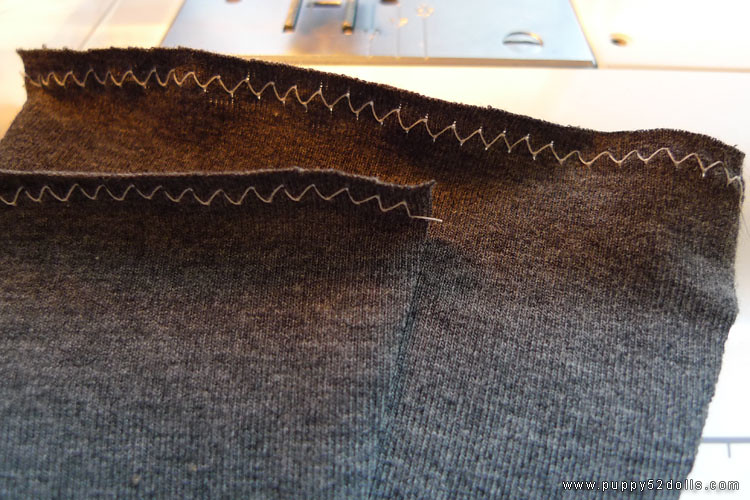
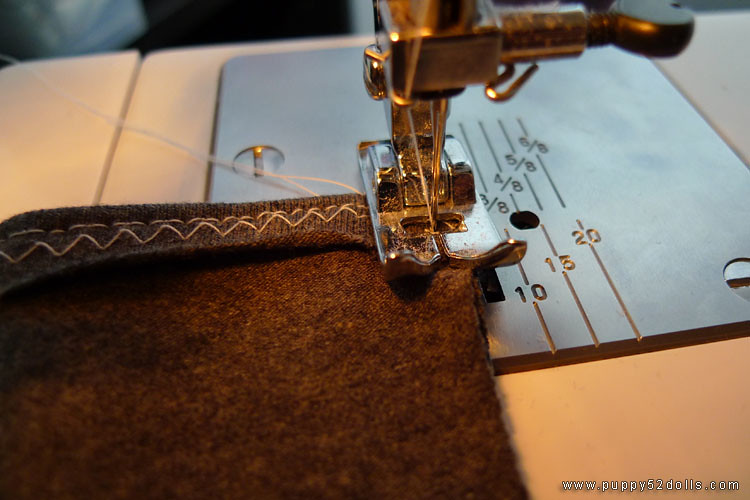
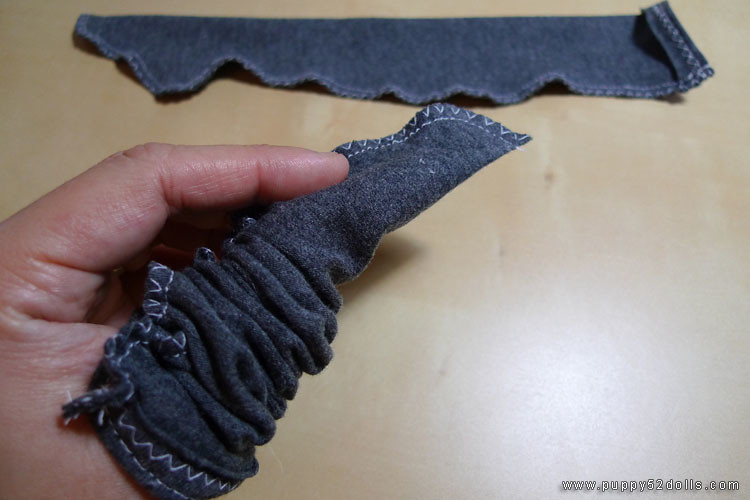
7) Sew a zig zag stitch along the “hole” of both of the socks.
http://farm5.static.flickr.com/4095/4887648698_c8afda9fcd.jpg

You can trim off the extra fabric near the end of the edge if you wish.

http://farm5.static.flickr.com/4080/4887648776_010f807cd9.jpg

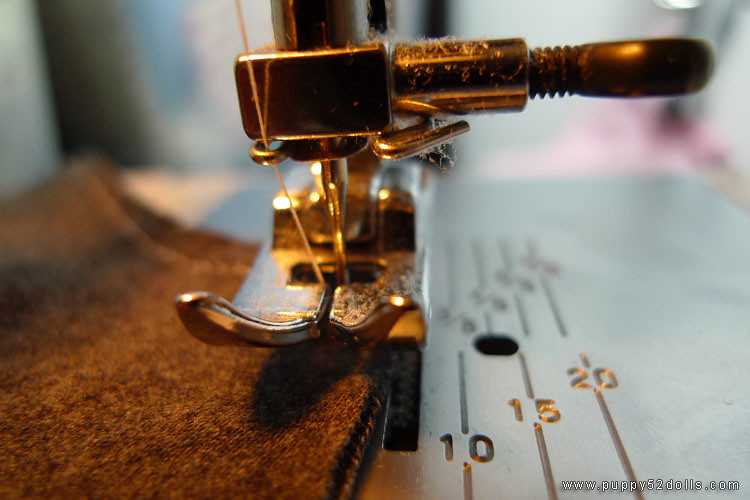
8) Fold in the edge of the socks where the zig zag is sewn into the wrong side of the pieces, sew a straight stitch along the fold.
http://farm5.static.flickr.com/4122/4887648840_961d06a214.jpg

When done, it will look like this the piece on the bottom is showing the “right” side, the piece on top is showing the “wrong” side.
http://farm5.static.flickr.com/4101/4887648884_3c4a961236.jpg

9) Take one sock, fold it with the wrong side facing out matching the end where the “hole” of the sock is, baste the part specified in the picture. This part is actually optional but recommended to ensure that the edges match up when you machine sew.
http://farm5.static.flickr.com/4073/4887648928_0480eb9174.jpg

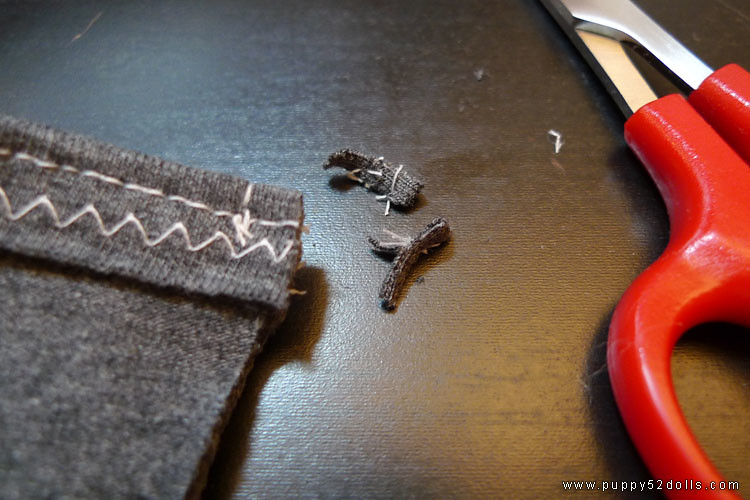
10) Trim off excess fabric at the edge to reduce bulk. Do the same for the other sock.
http://farm5.static.flickr.com/4095/4887648960_55432dc291.jpg

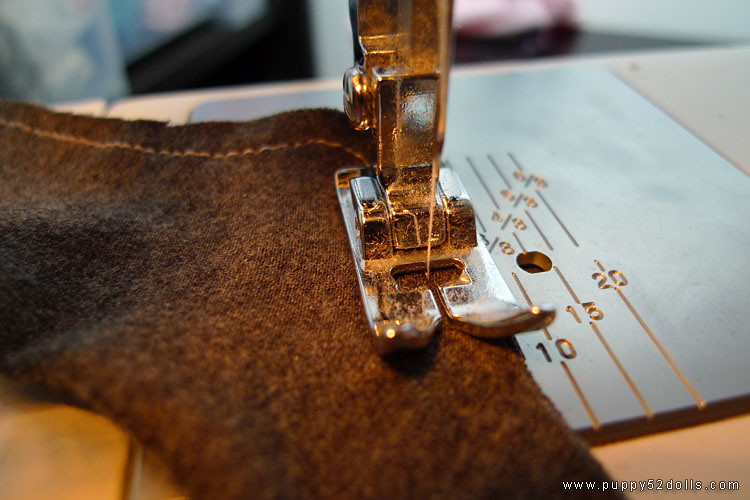
11) Starting from the end where the sock is basted start machine sewing  to join the sock. Use the hole where the needle is at the presser foot to gauge where you are sewing — which is about 0.5cm.
http://farm5.static.flickr.com/4136/4887046001_2e9b1a9ba0.jpg

12) When sewing around the corners, go slow and raise the presser foot time to time (With the needle in down position), use your right hand to stop the machine or roll the needle into down position before lifting the presser foot to prevent the fabric from moving from it’s position.
http://farm5.static.flickr.com/4118/4887046025_73f0620492.jpg

http://farm5.static.flickr.com/4139/4887046047_e0f8f1c4c7.jpg

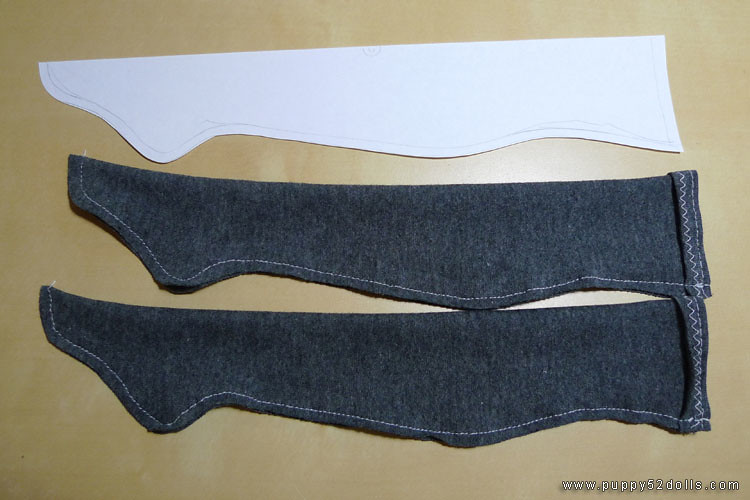
13) After the straight stitching completed for both socks, it will look as below, you can chose to turn the socks inside out at this stage and call it done, but I would recommend an extra step.
http://farm5.static.flickr.com/4140/4887046095_9d41b7d026.jpg

14) Using the zig zag stitch, finish the edges of the seam allowances.
http://farm5.static.flickr.com/4136/4887649160_e52371a4ef.jpg

Go slow around the corners, and do the lifting of pressure foot (With the needle in the down position) when needed.
http://farm5.static.flickr.com/4136/4887649194_bc0ff46f89.jpg

15)  Almost done!
http://farm5.static.flickr.com/4073/4887046205_8de5617bc1.jpg

Turn it inside out :D
http://farm5.static.flickr.com/4136/4887649248_30d9765f0d.jpg

Tadah! Hope this tutorial is not too confusing ^^; Haven’t made one in a long time :P
http://farm5.static.flickr.com/4095/4887649292_d873216380.jpg

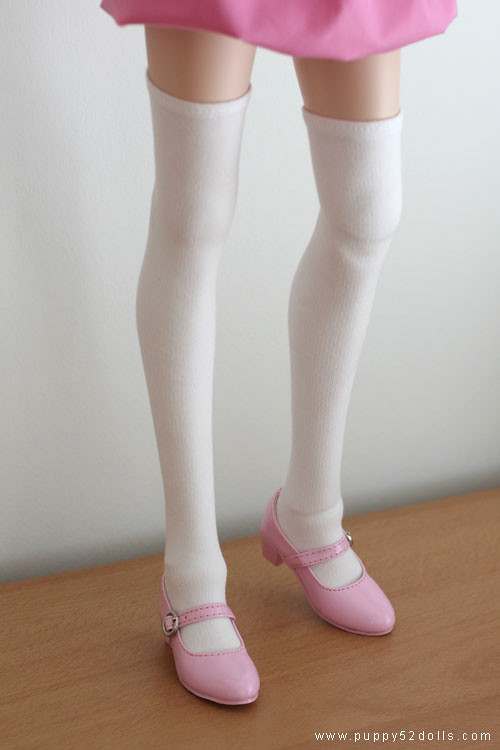
Reward your helpful Dollfie girl by letting her wear the socks ^^/ You can add ribbon or lace details to the socks if you wish :) If you do not own a sewing machine, but have lots of patience and can put up with hand sewing, you can sew the socks by backstitching. See here for a list of hand stitching :)
http://farm5.static.flickr.com/4135/4887046335_ca027aba03_b.jpg

And yes, this is a pair of “zettai ryouiki” socks :P you can use a ruler to mark the pattern if you prefer shorter socks for your Dollfie Dream girls, or any other dolls you try to make this pattern for ^^/ For a few more Himitsu in a white pair of zettai ryouiki socks as seen below, you can check this past entry :3 Yum!

http://farm5.static.flickr.com/4138/4863951321_5a5fe13f71_b.jpg

Share
Tagged with:
 

54 Responses to Tutorial: Dollfie Dream Socks – Printer Free Version!

  1. AMGitsKriss says:

    I really do need a Dollfie >.<

    [Reply]

    chun Reply:

    muhuhu~!

    [Reply]

  2. d.ark says:

    Good tutorial ^^

    [Reply]

    chun Reply:

    Thank you! :D

    [Reply]

  3. *bookmarked*

    [Reply]

    chun Reply:

    LOL took a while for me to realise what Chichi was… LOL

    [Reply]

    Chichi Gordon Reply:

    so the chichi u thinking of is it the same as what I meant? ^^;

    anyway rest well. it’s late. (‘~’)

    [Reply]

  4. lu-k says:

    Inspiring! Want to get into sewing now xD
    Great guide Chun =)

    [Reply]

    chun Reply:

    good luck and thank you :D

    [Reply]

  5. kuraikawai says:

    very nice guide Chun :)

    [Reply]

    chun Reply:

    Thank you :D I hope it is not too confusing ^^; and it’s only socks… LOL

    [Reply]

    kuraikawai Reply:

    not confusing at all! i love the way you did the initial pattern, I might use that idea :3…the way I did mine is more straight, didn’t copy the shape of the leg, the rest is very similar, so i’m happy I was doing it properly xD

    [Reply]

    chun Reply:

    I think if the fabric is stretchy enough, making it as straight lines is not a problem ^^

  6. yunamon says:

    Someone sponsor me a DD!

    [Reply]

    chun Reply:

    hahaha ^^;;;

    [Reply]

  7. coffeebugg says:

    yessssssss…. Moar thigh highs…. *froths at the mouth* I’ma make me some more of em.

    [Reply]

    chun Reply:

    Huhuhuhuhu ^O^!

    [Reply]

  8. eckotaku says:

    i better buy a dollfie TT^TT

    [Reply]

    chun Reply:

    good luck!

    [Reply]

  9. Awesome…even I could do that and I’m a spaz behind the sewing machine.

    [Reply]

    chun Reply:

    heh if you’re not comfortable with the sewing machine maybe can try hand sewing? ^^

    [Reply]

    Michelle "Ms. Geek" Klein-Hass Reply:

    Gotta get better at using my sewing machine…I have one, I should use it!

    [Reply]

  10. Wow, thanks for the tutorial! :D I’ve got to try making these (though I might have to hand-sew as I have no idea how to use my sewing machine XD).

    I’ve been recently trying to sew clothes and stuff for my Dollfie, and I think Zettai Ryouiki socks would be a great addition to that :3 (Also a lot easier because finding/reading patterns is what I have a problem with! XD) I’ve always wanted a pair for my dollfie…*starts rummaging through possible fabric options*

    [Reply]

    chun Reply:

    Nothing wrong with hand sewing, sometimes I find that people who hand sew have way more control over the outcome lol. Good luck with sewing for your doll :)

    [Reply]

  11. PrettyCranium says:

    Amazing! Will have to make some this weekend.

    [Reply]

    chun Reply:

    Good luck! I hope your machine behaves!

    [Reply]

  12. LeyLey says:

    this will be helpful WHEN i get my dollfie …

    [Reply]

    chun Reply:

    Good to know :D

    [Reply]

  13. Smithy says:

    Nice tutorial. Zettai Ryouiki FTW!

    [Reply]

    chun Reply:

    Thanks XD

    [Reply]

  14. OtakuDepot says:

    I was so happy when I saw you did a tutorial!!! Yea!
    I’m very new to sewing and love the easy way you came up with a pattern.
    I can’t wait till my dollfie arrives so I can try this out.

    [Reply]

    chun Reply:

    haha I thought about it for a while, had to kick my bum to do it… also use it as a chance to take a break from doing something else >_< Hope it helps and that you can do it :D

    [Reply]

  15. Kushieda says:

    I can now look at zettai ryouiki all the time now. ^^
    Though I’m afraid I’ll mess something up during production so I’ll leave it to the professionals.

    [Reply]

    chun Reply:

    ^o^ Dollfie dreams have great legs, good for Zettai Ryouiki lol!

    [Reply]

  16. The-O says:

    Complete sewing noob here, great guide. Ha! I was right, I’d figured you would have to turn whatever you are sewing together at the end inside out.

    [Reply]

    chun Reply:

    lol about turning stuff inside out, mostly yes indeed :)

    [Reply]

  17. kmyk says:

    love the tutorial chun~ thanks

    I have a machine but I can never get it to respond the way i want :’(

    [Reply]

    chun Reply:

    you welcome! too bad hand sewing is much slower ^^;;;

    [Reply]

  18. di-chan says:

    awesome tutorial! I’m going to try this out ^^! (when I get the chance that is)

    [Reply]

    chun Reply:

    hu good luck :D:D look forward to see what you come up with!

    [Reply]

  19. Refeti says:

    Good one! I’m going to make some black and white ones XD but I need to hand sew them *_* Thanks for posting the tutorial!

    [Reply]

    chun Reply:

    Look forward to see it! :D Good luck!

    [Reply]

  20. Ovada Bey says:

    I’ll make these soon :)
    Great tutorial! :D

    [Reply]

    chun Reply:

    Hope it helps :D!

    [Reply]

  21. AnimeLover says:

    Great tutorial! I’m just starting to make doll fashions, so I use a LIV doll. (inexpensive and cute!^.^)

    [Reply]

    chun Reply:

    Thanks, glad you think so :)

    [Reply]

  22. Eosthilas says:

    Thank you so much for posting this! This method saved me so much time and swearing, and the socks came out perfect on the first try!

    [Reply]

    chun Reply:

    I’m glad you found it helpful! :D

    [Reply]

  23. Kiralovesdogs says:

    Ohhh, I can’t wait to try this on my new dollie, Glados! Hopefully, my sewing machine won’t glitch up, like it always does when I get excited about sewing something.

    [Reply]

    chun Reply:

    Remember to get needle suitable for sewing stretch fabric ^^ and make sure your sewing machine is oiled/cleaned :3 That might help :D Good luck!

    [Reply]

    Kiralovesdogs Reply:

    The socks worked out great! I was very happy with them. I took your advice, and my machine only glitched once. This is an awesome tutorial!

    [Reply]

  24. Edwin says:

    Nice tutorial that helps alot =D!

    [Reply]

  25. Just wanted to let ya know I shared this on my blog and pimped you, hehe

    http://majokkoshop.blogspot.com/2013/03/how-to-make-socks-for-your-dolls-free.html

    [Reply]

    chun Reply:

    Thank you as always :D

    [Reply]

Leave a Reply

Your email address will not be published. Required fields are marked *

You may use these HTML tags and attributes: <a href="" title=""> <abbr title=""> <acronym title=""> <b> <blockquote cite=""> <cite> <code> <del datetime=""> <em> <i> <q cite=""> <strike> <strong>